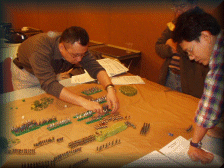
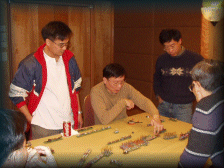
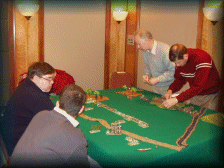
Mid-Monthly meeting, Saturday 22 January 2005
after action report
2nd
With
Christopher Chu and Tom Tong leading 400 AP of Takeda, against James
Cheung herding his Uesugi in the direction of the enemy at Kawanakajima.
Christopher had
the Takeda, consisting of 9 cavalry, a dozen foot samurai, Ashigaru and 8
armed with matchlock and light cannon. Tom
Tong commanded the Takeda left wing which consisted of bowmen (Bw (I)) and
Ashigaru.
On
the Uesugi side, Shogun James brought a truckload of samurai, both Fast
and Ordinary, he had learned his lesson from last time however, and would
not convert his cavalry in to Lancers (F), with a huge number of Town
militia behind. He divided his
army into 2 commands.
Both sides deployed a centre full of Ashigaru, Takede’s cavalry preceded by a screen of samurai, while the Uesugi deployed their cavalry on the left wing.
 At
the start of the battle, James apparently decided that he must bring his
army forward, leaving the militia to straggle behind, so that the samurai
formed across the front of the left wing of the battlefield, his cavalry
initially keeping pace with their archers. Christopher
& Tom were thinking of other tactics. They
left their left wing to follow as best they could; Christopher dispatched
his Japanese in a mad gallop forward
and struck the Uesugi line from the front.
At
the start of the battle, James apparently decided that he must bring his
army forward, leaving the militia to straggle behind, so that the samurai
formed across the front of the left wing of the battlefield, his cavalry
initially keeping pace with their archers. Christopher
& Tom were thinking of other tactics. They
left their left wing to follow as best they could; Christopher dispatched
his Japanese in a mad gallop forward
and struck the Uesugi line from the front.
The
Uesugi, having barely stirred from their lines, met the Takede steadily.
On the right, a brave samurai pierced the Takede front, while much of the
Takede samurai were driven back. However,
a Takede commander was killed at that moment
by the enemy’s
handgun shooting, while
the Uesugi Sipahis sallied forth and swept between the commander and his
supporters, cutting the enemy off from any hope of reinforcement. The
Takede’s right was paralyzed because of the need of an extra pip to move
after that command’s general was lost.
On the left, Tom Tong decided to mount a counter-charge of Ashigaru (Bd
(F)), but was brushed aside by the infuriated remnants of James’
command, and was then crushed under the hooves of the mounted Samurai, as
the Shogun led his wedge of cavalry through the swirling melee, so
that the Takede forces on that side were dismayed, and fled also. James’
forces started sweeping around the end of the Takeda line. Meanwhile,
the hapless Tom fled further and further across the field of battle,
unaware that the threat of the Takede’s troops had evaporated more than
a few turns ago.
Then the Uesugi darted in, falling on the Takede rear, breaking up their lines and making the enemy twist in their saddles.
Final
result: Takede was broken on the 10th turn, losing 2 out of 3 commands,
while the Uesugi lost no more then 10 units, with insufficient casualties
in any commands to break overall.
-
Christopher Chu rolled triple 1 for his command dice for Pips in the first game bound, while James rolled double 1. This situation appears only once in 7,776 chances.
-
Near to the game’s close, only the throw of a 6 would avoid the defeat of the Takede army through the elimination of one more unit, Christopher unexpectedly threw 6 twice in succession enabling him to hang on, though his side finally lost the battle.
Lessons from the battle:
-
A good battle plan & deployment can sometimes overcome poor pips (don’t put cavalry behind foot troops);
-
Don’t roll the wrong side of a 6:1 when using your C in C;
-
Cover the flanks of each command; and
-
Don't try fancy manoeuvres and don’t let your troops move too far from your commander (that’s a waste of your pips).
GHQ
Micro Armour
The
GHQ modern battle is quite a fast and bloody one that we tasted at the
last meeting. I commanded a
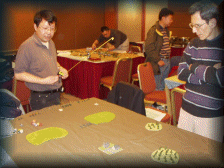 The
objective was to take the small town in the middle of the map. Philip
separated his tanks into 3 groups; one of which directly charged the town.
My tank force was also divided
in 3 parts, trying to flank the enemy. The
infantry units of both sides were moving behind the hills to avoid fire
from the enemy tanks. In the
first 2 turns, the tank units on both sides exchanged fire and lost about
one third of their number. The powerful weapons we found were the attack
helicopters, especially the French one; because it can fire 3 times a
turn. In the third turn I used
my M2A2 to fire on the enemy tanks and tried to charge the town, but was
unsuccessful. On the other
side, my artillery fire mission stopped their recon units, which were
trying to flank my infantry units. In
the fourth turn, most of the M1’s had been destroyed or neutralized and
the Apache was out of missiles, making a successful US counter-attack
impossible. The
The
objective was to take the small town in the middle of the map. Philip
separated his tanks into 3 groups; one of which directly charged the town.
My tank force was also divided
in 3 parts, trying to flank the enemy. The
infantry units of both sides were moving behind the hills to avoid fire
from the enemy tanks. In the
first 2 turns, the tank units on both sides exchanged fire and lost about
one third of their number. The powerful weapons we found were the attack
helicopters, especially the French one; because it can fire 3 times a
turn. In the third turn I used
my M2A2 to fire on the enemy tanks and tried to charge the town, but was
unsuccessful. On the other
side, my artillery fire mission stopped their recon units, which were
trying to flank my infantry units. In
the fourth turn, most of the M1’s had been destroyed or neutralized and
the Apache was out of missiles, making a successful US counter-attack
impossible. The
Lightning War Series Card Games
Midway - Lawrence Hung and Simon Shum
played a tourney of 4 out of 6 wins of this short and playable game. Each
game can be played in 30 minutes. The game mechanics really suit the
nature of naval warfare, where aircraft force management is emphasized.
With the initial dispositions on both sides, players draw a hand of 9
cards. Each turn a player can
"re-supply"
up to 3 additional forces on the table (read ready for takeoff). The
game sees the Japanese with an initial attack advantages in all 4 plays.
This is a bit luck dependent because the more force cards you draw
initially, the earlier you can prepare them for the attack on enemy ships.
Of course, you always get the
chance to avoid battle by "No Target" special card (due to God's
hand I guess).
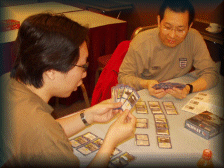 The
cards also features leader and tactic cards, some of which can form a card
combo increasing your attack capabilities with the right types of attack
planes (e.g. torpedo bomber + Dive Bomber in a combined strike). Leader
cards usually add to the attacking force value, with the higher one
winning the battle. The force
value on the card can represent both attack and defence value, with
special abilities to boost either one as specified on the cards. We
found that the game was fun and exciting, with an imbalance in favour of
the Japanese, more so because of their superior starting force advantage. Of
course others might want to play the
The
cards also features leader and tactic cards, some of which can form a card
combo increasing your attack capabilities with the right types of attack
planes (e.g. torpedo bomber + Dive Bomber in a combined strike). Leader
cards usually add to the attacking force value, with the higher one
winning the battle. The force
value on the card can represent both attack and defence value, with
special abilities to boost either one as specified on the cards. We
found that the game was fun and exciting, with an imbalance in favour of
the Japanese, more so because of their superior starting force advantage. Of
course others might want to play the
A
trick in the card play is that there can be no two play cards of the same
type (tactic, leader and event) in play per battle. That means you gotta
"kick-out" the card type your opponent just played with your own
"weaker" card of the same type. So
a weaker leader can kick out the stronger enemy leader with the reversal
on the force value committed to the battle, you add and he minuses. The
objective of the game is to strike out all your opponent's carriers (yes,
they are all carriers in this game except, of course, the
Another “Lightning War” series card game.
This one focuses on the D-Day action of capturing 5 landing
beaches. The Allied must
capture at least 4 of the 5 to secure at least an historical victory. This
game is less dynamic as compared to the Midway one, as the scope is more
restricted in terms of the forces and the card types and play. No
leader cards are included, but the historical military units with
designations are featured. Some
of the key units, like the Allied 82nd and 101nd Airborne, I Corps, German
21st Panzer and 352nd Infantry are included.
Each side has 3 force cards (units) on each beach
and they are shuffled to create "limited" randomness on the
order of appearance of the units. The
action cards are used to boost the "combat value" of the units
participating in attack or defence. They
are mostly special weapons employed during the battle, e.g. Heavy
Artillery and Bunkers. The
German had a higher odds with the special action cards like Leadership,
Local Command, Redeploy and Reinforcement. So they have the initiative
during the opening phase of the D-Day. We
had a 1-1 records in a play of 2 games, but I guess the German might have
had the upper hand eventually, had we been able to continue on.
The predefined 5-turn game also somewhat limits the
gameplay experience. The number of cards in your hand each turn is also
specified on each turn cards. So
you will feel that you are somewhat pre-determined as to the outcome. Overall,
not a bad game, but not a lot of surprises either. It
all ultimately depends on whether you like the concept of playing pure
cards for a historical game.
And the rest . . .
 |
|
 |
 |