|
The
Defence of Hong Kong
Shing
Mun Redoubt and the Gin Drinker's Line
by
John Cartwright
Introduction
On
December 7th
1941
the Japanese Imperial Navy attacked
Pearl
Harbour
, which
resulted in the
United States
of America
declaring war
on the Japanese. The following
day Japanese aircraft attacked the Royal Air Force contingent based at Kai
Tak airfield, situated on the mainland of the British Crown Colony of Hong
Kong, which destroyed all of the dated aircraft available.
This air attack was a prelude to a land invasion of
Hong Kong
, from the
Chinese mainland, that resulted in the capture of the Colony and the entire
garrison within eighteen days. This
article is concerned primarily with the British attempts to defend the
mainland from the Japanese attack. British
resistance was based on a defence line knows as the Gin Drinker’s Line
because its’ western flank rested on Gin Drinker’s Bay.
The plan was that this line was to hold for three weeks during which
the defences of
Hong Kong
Island
could be
completed and the invading forces subjected to delay and attrition.
This
article is broken down into five sections:
·
Geography
·
War Plans
·
Shing Mun Redoubt and its capture
·
Retreat to
Hong Kong
Island
and final
surrender
·
The battlefield(s) today
Despite
its’ small geographic size Hong Kong has a considerable number of military
structures standing from both the Victorian era, Second World War and Korean
War.
Geography
The
map below gives a general view of
Hong Kong
, showing the position of Mainland
China
to the North.
The land boundary between
Hong Kong
and
China
is roughly 35
Kilometres long, with most of the borderline being delineated by the course
of the
Shum
Chun
River
that flows
from East to West. In the area
East of Sheung Shui the river is very narrow and can be crossed on foot
without any difficulty. The
New
Territories
of
Hong Kong
is the area
north of Tsuen Wan and this was largely agricultural land with small
villages. The area around
Kowloon
was largely
residential and industrial, while
Hong Kong
Island
itself was
the most developed both in terms of residential homes, business and
industrial complexes.
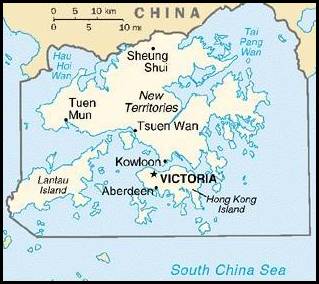
Map
1:
General View of
Hong Kong
The
British had no intention of holding any attacker along the Sino-Hong Kong
border itself, with the main defence line being on the range of hills that
separate
Kowloon
from the
rural
New
Territories
.
Map 2 below shows the
New
Territories
,
Kowloon
peninsula and
most of
Hong Kong
Island
.
This map would appear to be a Japanese intelligence map because it
has Japanese notations on all the military defence positions.
The Gin Drinker’s Line was a string of defence points, primarily
pillboxes and trenches surrounded by wire and situated on various hills
separating Kowloon from the New Territories.
The key defensive position on this 18 kilometre line was the Shing
Mun Redoubt, located on a spur overlooking Shing Mun Reservoir.
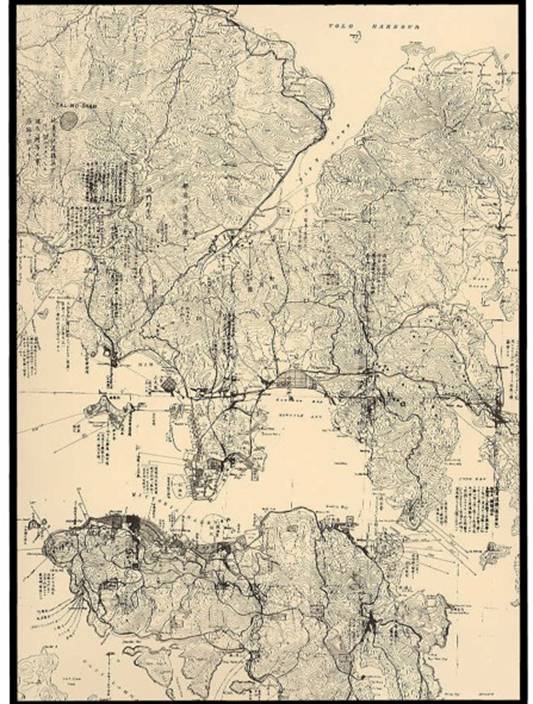
Map
2:
The above map is an Ordinance Survey Map with annotations in Japanese.
The map shows many, but not all of the British defence positions.
The three large blocks of Japanese characters on the top left of the
map all relate to Shing Mun, Tai Mo Shan and the locality of the main
Japanese attack on the mainland.
 The
terrain along the Gin Drinker’s line is rugged with some steep volcanic
hills and dense jungle undergrowth. A
network of paths, some along water catchments, linked the various locations
and there were some reasonable narrow metalled roads built to access
reservoirs and positions on the hilltops.
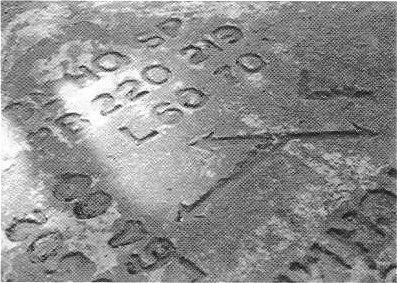
The picture on the left is of one of the marker stones that are still
distributed along parts of the Gin Drinker’s Line.
It is thought that these stones were to aid navigation and assist in
directing artillery fire. The
terrain along the Gin Drinker’s line is rugged with some steep volcanic
hills and dense jungle undergrowth. A
network of paths, some along water catchments, linked the various locations
and there were some reasonable narrow metalled roads built to access
reservoirs and positions on the hilltops.
The picture on the left is of one of the marker stones that are still
distributed along parts of the Gin Drinker’s Line.
It is thought that these stones were to aid navigation and assist in
directing artillery fire.
The
Japanese had excellent intelligence sources and are believed to have built a
mock up of the Shing Mun Redoubt to practice their assault tactics.
War Plans
The
Japanese had been fighting in Mainland
China
since 1937
and had been moving close to the
Hong Kong
border in the
run-up to their attack. The
British tended to be rather dismissive of the fighting abilities of the
Japanese soldiers and were confident that the Colony could hold out if
attacked, provided some assistance was sent.
The outbreak of war in Europe resulted in many of the better troops
being sent to Europe, with less capable personnel being left in Hong Kong.
In November 1941 the garrison was only thought to be sufficient to
hold Hong Kong Island itself, but two Canadian Battalions arrived in Hong
Kong one month before hostilities commenced and this led to old plans being
re-introduced to hold the Gin Drinker’s Line which was expected to hold
for at least three weeks. The
Garrison of Hong Kong included the units shown on the following page.
The naval forces did not play a significant part in the battle and
have been excluded from this table.
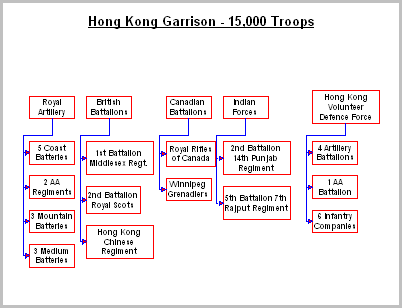
On paper the Hong Kong Garrison looked reasonably strong with
more than six line battalions, and a considerable number of artillery guns.
However, these numbers are deceptive because of numerous problems
which included:
·
The two Canadian Battalions had only been in
Hong Kong
for one month
and were not familiar with the terrain or other units.
Both units were also inexperienced and did not have all their heavy
equipment, especially transport. The
Canadians have claimed that they were sent to Hong Kong not expecting to be
involved in any fighting with some of their personnel officially classified
as ‘unfit for combat’.
·
The two British Battalions had lost many of their most
capable officers and men to redeployments in
Europe
.
·
The RAF and Royal Navy had been stripped of their primary
assets for the War in
Europe
and the Japanese obtained total air superiority after
destroying the obsolete RAF aircraft at Kai Tak.
·
The majority of the defences had been designed to withstand a
naval attack, and most of the fixed artillery was positioned to engage ships
at sea. There was also a lack of
High Explosive (HE) shells because armour piercing shells were required to
engage warships
·
There was a general contempt for the fighting ability of the
Japanese and inadequate preparations were taken to defend
Hong Kong
from a
determined and capable attacker.
·
The attempt to defend the Gin Drinker’s Line on the
Mainland spread the British Forces too thinly.
With only three Battalions to defend 18 Kilometres, originally
designed to be held by six Battalions, dispersed the units allowing for a
spectacular early defeat from which they never had chance to recover.
In
comparison the Japanese forces were based around the 38th
Infantry Division under General Sano. This
Division had three infantry Regiments, the 228th, 229th
and 230th. Each
of the Regiments had about 3,000 fighting troops with their own company of
75mm guns and light mortars. The
Division also had some thirty-six 75mm Field Guns to provide artillery
support. These troops were
battle hardened having fought the Chinese for nearly five years.
It was to be the 228th Regiment under Colonel Doi
Teishichi who would attack and capture Shing Mun Redoubt and the surrounding
area. We do not know if he had
his full complement of troops, but he certainly did not have any of his
wheeled artillery to support the attack.
The total Japanese Forces, including the air force and navy, used in
the invasion of
Hong Kong
was
approximately 40,000 men.
Shing Mun
Redoubt
Map
3 below has been highlighted to show the position of the Shing Mun Redoubt,
marked in light green, and the relative position of the Gin Drinker’s Line
which is in red. The blue area
is Shing Mun Reservoir itself. It
should be noted that the Gin Drinker’ Line was not a solid defence line,
but a series of defence position linked by paths.
Tai Mo Shan, marked just to the north west of Shing Mun is the
highest point on the Hong Kong mainland, and was captured by the Japanese
without any fighting.
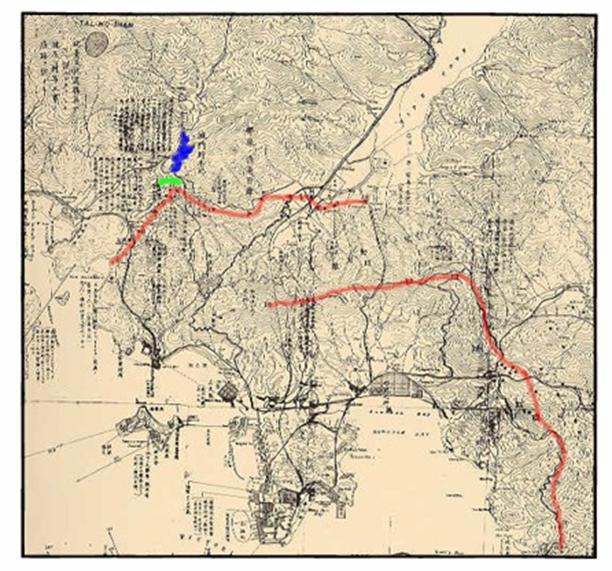
Map
3:
Map showing the position of Shing Mun Redoubt and its position in relation
to other key features. The
capture of the Redoubt would open up the whole of the left flank of the
defence line.
The
defence of the Gin Drinker’s Line was given to three of the available
Battalions. The Royal Scots were
to cover the left side; the Punjabis covered the centre and the Rajputs the
right flank. This deployment had
little prospect of holding the Japanese indefinitely, but it was hoped that
the line would hold for about three weeks and allow considerable casualties
to be inflicted on the Japanese.
The
Gin Drinker’s Line also lacked adequate artillery support.
Some of the costal batteries could provide covering fire, but the
lack of H.E. shells resulted in them firing armour piercing rounds which
tended to inflict more damage on the concrete redoubt than on any attackers.
The
Redoubt itself is a unique military structure sited on the forward slope of
Smugglers Ridge Hill. On a clear
day someone on this ridge has a good view of the two main roads leading to
the
Kowloon
Peninsula
from the
New
Territories
and the
Chinese Border. The Redoubt also
straddles one of the main ‘ancient pathways’ used by villages in the New
Territories to travel to Kowloon.
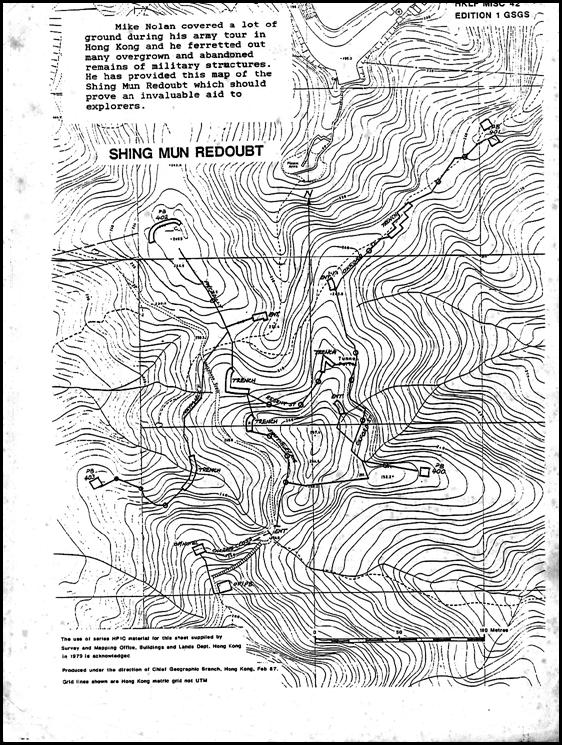
Shing
Mun Redoubt was positioned above the Reservoir with five machine gun
pillboxes, a command post, artillery observation post and five open firing
positions, complete with fire step. The
plan below is believed to have been prepared by a Mike Nolan, possibly of
the British Garrison in
Hong Kong
in the 1970s
or 1980s. The map was supplied
by David Russell, a Superintendent in the Royal Hong Kong Police, who
lectured the military and others on the invasion of
Hong Kong
.
The
citadel had been prepared in the 1930s and had never been completed because
it had been realised that at least six Battalions would be needed to defend
the Gin Drinker’s Line and this was never likely to be available.
In 1941 the British attempted to hold this line with only three
Battalions with predictable results. The
Redoubt is spread over various levels and it was not possible for the
various positions to provide supporting fire to each other, and in many
cases they are not within sight of each other.
There are numerous areas of dead ground allowing attackers to
infiltrate the position without being observed.
There are also numerous entrances into the complex, none of which
were secure. Attackers could
enter the concrete tunnels through the various fighting positions or by the
main entrances. The concrete
tunnels also had ventilation holes through which any attacker could throw
grenades with ease while remaining out of sight.
There can be little doubt that Japanese intelligence had already
identified these deficiencies, and hence their willingness to tackle the
complex head on.
The
Redoubt was designed to have a full company of infantry to hold it but on
the 9th December 1941
there were
only fifty men of the Royal Scots in the position, and a reasonable
proportion of these were artillery observers and command elements.
The
Japanese 228th Regiment had crossed the Sino Hong Kong Border on
8th December 1941
, and reached
Shing Mun by the evening of following day.
The British had blown all the road brides but the Japanese advanced
on foot using traditional village paths.
The British command had expected it to take days for the Japanese to
reach the Gin Drinker’s line, and this rapid advance caused further
dislocation of the British defence efforts.
The
Japanese 228th Regiment reach Needle Hill, which lies directly
opposite and above Shing Mun Redoubt, on the afternoon of
the 9th
December 1941
. From this
location they conducted detailed surveillance on the citadel. Although
not ordered to attack the position, Colonel Doi Teishichi decided that it
was undermanned and vulnerable to an attack launched from Smugglers Ridge
Hill. When darkness fell 150
Japanese crossed the Shing Mun River, below the main dam and climbed to the
top of the 337-meter high Smugglers Ridge Hill.
They then launched a determined assault on the citadel from the east
and south, supported by the main Japanese assault across the main dam
itself. The assault came as a
complete surprise to the defenders, partially because they had failed to
deploy any foot patrols outside the redoubt itself.
It
would appear that the 43 defenders were completely overwhelmed, and despite
reports to the contrary do not appear to have put up much of a fight.
None of the defenders were killed during the attack, although one
subsequently died from his wounds and two men from a Mountain Battery died
in the Observation Post. Despite
this pill box 401B held out for some hours, but it was totally isolated when
the remainder of the citadel garrison withdrew back to Golden Hill.
The
Royal Scots supported by elements of the 7th Rajputs, were
ordered to mount a counterattack on the morning of the 10th
January to recapture the Redoubt. This
attack never materialised because the British were not able to mobilise
sufficient resources to make the assault viable.
On the 10th the Japanese consolidated and then launched a
series of further attacks on the following day.
This led to a complete disintegration in the defence line and orders
were given to withdraw all units to
Hong Kong
Island
.
Retreat to
Hong Kong
Island
and Surrender
The
British withdrawal from the mainland was commenced at
midday
on the 11th
January with the 7th Rajputs being the last to leave during the
early morning of the 13th January.
This evacuation was achieved with minimal losses thanks mainly to the
inactivity of the Japanese forces. The
Winnipeg Grenadiers helped cover this retreat, and a young Canadian, John
Grey was captured when he became separated.
He was subsequently executed by the Japanese and became the first
Canadian soldier to die in combat during the war.
With
the British forces now confined to the
Island
of
Hong Kong
, the Japanese
prepared for an amphibious assault. On
the evening of
18th
December 1941
they launched
an attack with three Regiments in area around North Point and Lee Yu Mun
Barracks. Map 2 above
shows this area, with notations showing the range of the various guns
mounted in the area of the Barracks. Despite
some severe fighting the Japanese succeeded in reaching the centre of the
Island in twelve hours. The most
severe fighting took place around Wong Nai Chong Gap Police Station, and it
was only on the 23rd that the Canadian Grenadiers were finally
forced to surrender. This
allowed the Japanese to split the defending British forces into two pockets,
and their eventual demise was only a matter of time.
On the 24th December the Governor finally surrendered to
the Japanese although some units continued to fight until 0230 hours on
Christmas Day.
The
British lost at least 1,500 troops during the fighting for
Hong Kong
, although
some estimates give 2,400 fatalities. The
survivors were to loose another 25% during some brutal years of captivity.
The execution of prisoners and wounded by the Japanese is well
document and some of those concerned were subsequently convicted of war
crimes. One Victoria Cross was
awarded to J.R. Osborn of the Canadian Grenadiers for his part in the
fighting around Mount Butler in the centre of the Island.
Of
the 40,000 or so men of the Imperial Japanese Forces earmarked for this
invasion, less than 700 were killed, and 1,500 wounded.
A large memorial was constructed during the occupation to celebrate
this Japanese victory, but the local Chinese destroyed this in 1945 when the
Japanese surrendered. Throughout
the war there was an active resistance, particularly in the New Territories,
and the Japanese raised whole villages.
Traces of some of these villages can still be seen today, such as
Cheung
Sheung
Village
in
Sai
Kun
Peninsula
.
The
Battlefield Today
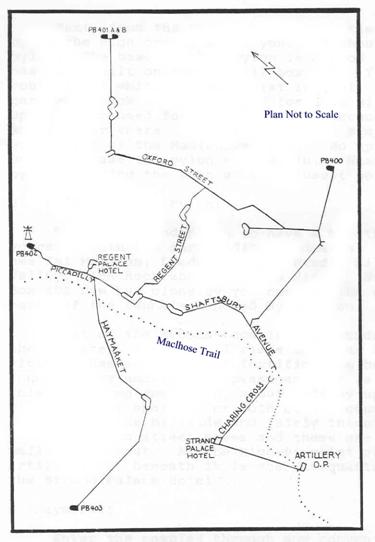
Shing
Mun Redoubt is still virtually intact, although some of the tunnels are now
flooded and silted. It is
possible to walk round the whole complex, and walk through parts of the
tunnels. The Command Post,
partially destroyed by Japanese sappers, is clearly visible just by the
MacLehose Trail. Some of the
other positions are harder to locate because of the undergrowth.
The plan below will assist anyone exploring the area.
The large electric pylon by PB 402 is a good reference point to work
from. This plan is also believed
to have been prepared by Mark Nolan, see reference above.
Many
other parts of the Gin Drinker’s Line are still visible and fairly intact.
Lei Yu Mun Barracks has now been converted to the Hong Kong Museum of
Coastal Defence, and this is a good starting point for anyone interested in
this subject.
In the New Territories there are also some interesting fortification
built during the course of the War in Korea.
Not a great deal has been written about the Japanese capture of Hong
Kong but I would strongly recommend the following publications which I have
used in preparing this article:
· Battlefields Review, Issue 16 published by Wharncliffe
Publishing Ltd. in November 2001.
· Ruins of War by KO Tim-Keung and Jason Wordie.
Joint Publishing (HK) Co. Ltd. 1996.
· Not the Slightest Chance, The Defence of
Hong Kong
1941, Tony
Banham. Published
5/1/03
.
Although I have not seen this book I have corresponded with the
author and he would appear to know his subject.
|